

Wednesday, March 14, 2012
Student work has moved on over to Artsonia!
I've decided to brand my own work with "Zippity Art" as I begin to work and gather ideas for my own Etsy store. Not wanting to come across as exploiting my teaching as a way for advertisement, I wanted to be sure and post that this will slowly turn into my own personal blog, while all RMS student work can be viewed on Arsonia here: http://www.artsonia.com/schools/school.asp?id=85211 or through my teacher website, www.aprilduda.com!
Thursday, February 24, 2011
3rd Graders H.E.L.P. Spread the Word - Shelter Pet Awareness Posters
This lesson is very near and dear to my heart. I am very passionate about education, but when I can use that to help out my local community, especially our little furry friends, it really reinforces why I do what I do. H.E.L.P. (Homes for Endangered and Lost Pets) is a local foster pet organization. A woman from H.E.L.P. came in to speak to the 3rd graders during a small assembly. She discussed why we should think about adoption, why some animals end up in shelters, and why we need to be their voice. The students even got to meet and pet a (hypoallergenic) dog that H.E.L.P. was fostering at the time!

Back in the classroom, we talked about the assembly and I answered any questions they may have not had the chance to ask. I then showed them commercials and ads from TheShelterPetProject.org (Ad Council). We discussed the layout of the posters and their message. We also focused on slogans and came up with some really great ideas. I have to admit, I had a few moments of teary eyes as I saw how excited the kids were getting about helping out our local animals.

I gave the students packets with various "How to Draw" step by step cats and dogs. Students were also allowed to use some collage if they struggled with their drawing (The objective here was to design a strong layout and create a positive and helpful message). We also discussed color theory when it came time to use markers and colored pencil to color their posters. I showed them complimentary colors, monochromatic color schemes, and what colors may not be the best idea for their slogans (i.e. bright yellow on a white background). The kids worked so hard on these and did a fantastic job! H.E.L.P. even hung about 13 posters around Batavia to spread awareness and show off the kids' work!


IL.5.A.3b - Design a project related to contemporary issues (e.g., real-world math, career development, community service) using multiple sources.
IL.25.A.1d - Visual Arts: Identify the elements of line, shape, space, color and texture; the principles of repetition and pattern; and the expressive qualities of mood, emotion and pictorial representation.
IL.29.C.3c - Create simple print and/or non-print media messages in the target language modeled on media examples (e.g., advertisements, posters, television, radio, brochures, websites).
IL.SEL.33C - Contribute to the well-being of one’s school and community.

Back in the classroom, we talked about the assembly and I answered any questions they may have not had the chance to ask. I then showed them commercials and ads from TheShelterPetProject.org (Ad Council). We discussed the layout of the posters and their message. We also focused on slogans and came up with some really great ideas. I have to admit, I had a few moments of teary eyes as I saw how excited the kids were getting about helping out our local animals.

I gave the students packets with various "How to Draw" step by step cats and dogs. Students were also allowed to use some collage if they struggled with their drawing (The objective here was to design a strong layout and create a positive and helpful message). We also discussed color theory when it came time to use markers and colored pencil to color their posters. I showed them complimentary colors, monochromatic color schemes, and what colors may not be the best idea for their slogans (i.e. bright yellow on a white background). The kids worked so hard on these and did a fantastic job! H.E.L.P. even hung about 13 posters around Batavia to spread awareness and show off the kids' work!


We were even featured at TribLocal - Batavia!


IL.5.A.3b - Design a project related to contemporary issues (e.g., real-world math, career development, community service) using multiple sources.
IL.25.A.1d - Visual Arts: Identify the elements of line, shape, space, color and texture; the principles of repetition and pattern; and the expressive qualities of mood, emotion and pictorial representation.
IL.29.C.3c - Create simple print and/or non-print media messages in the target language modeled on media examples (e.g., advertisements, posters, television, radio, brochures, websites).
IL.SEL.33C - Contribute to the well-being of one’s school and community.
Wednesday, February 23, 2011
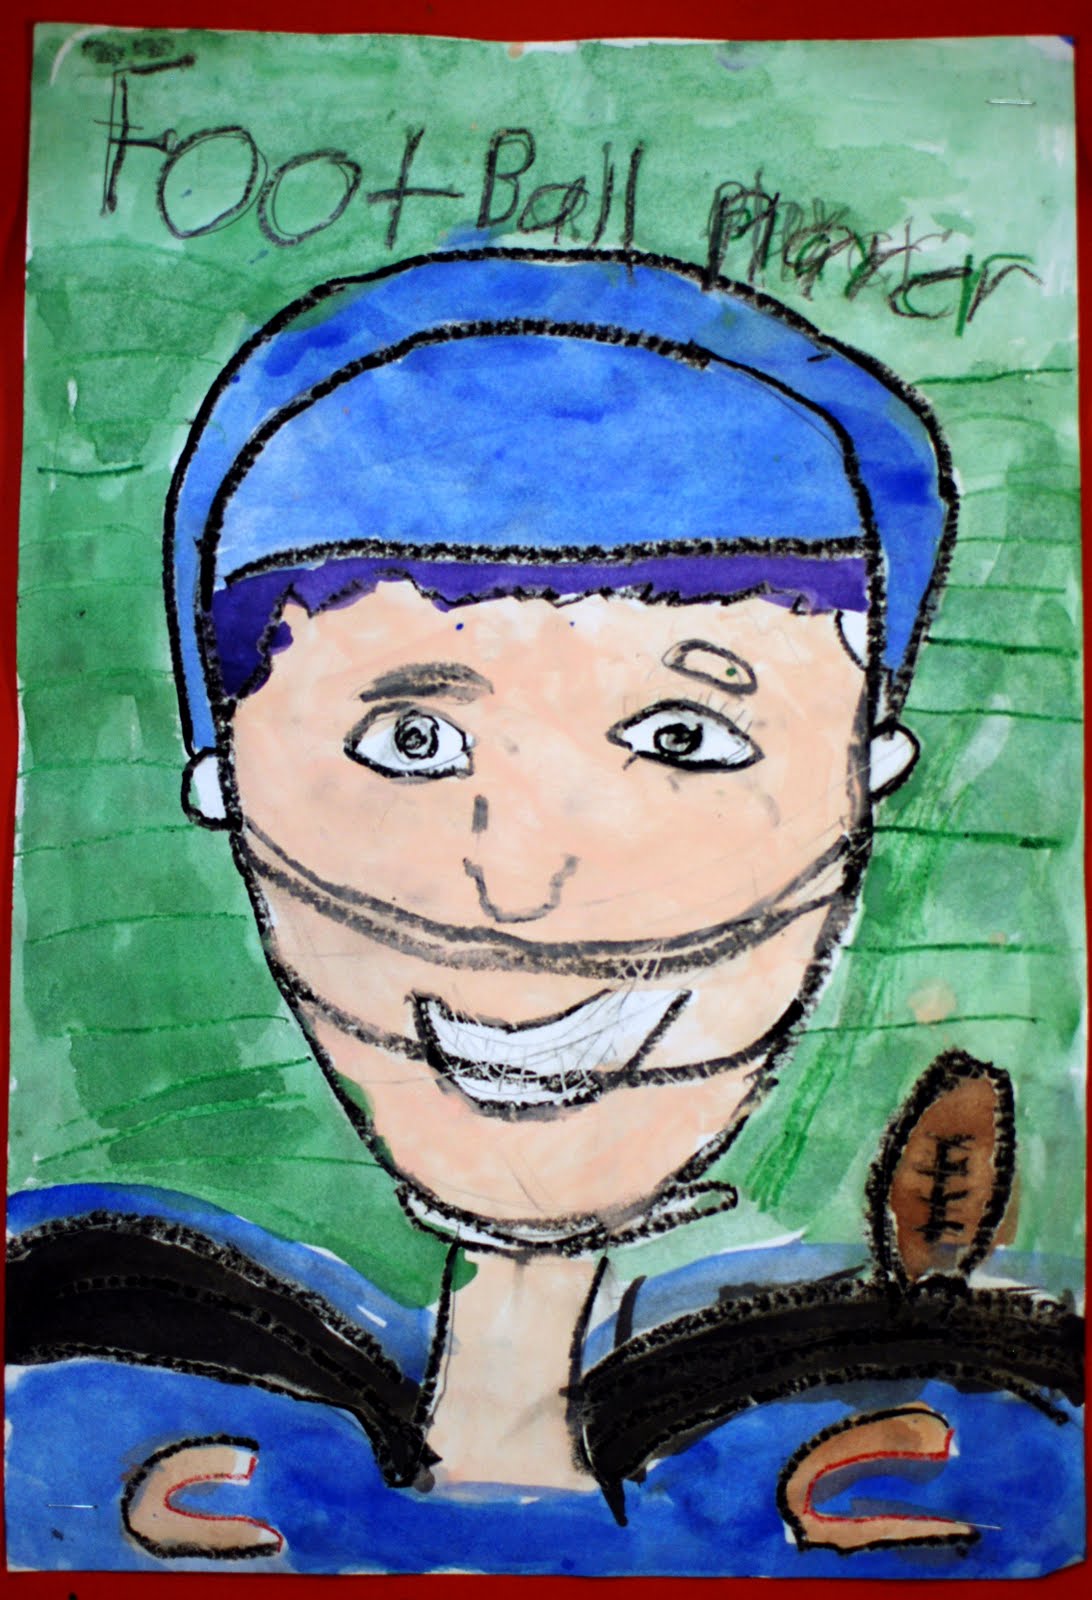
"What I Want To Be" Self Portraits - 1st Grade
This lesson began by discussing different things we can be when we grow up. Students gave so many fun choices! Doctors, princesses, knights, veterinarians, teachers, football players, and many more were mentioned. Once students had some ideas flowing, they received their paper (12x18"), pencils, and a face tracer. The tracer helped them draw basic head and eye shapes (as these can be very frustrating at this age). I then had students look into mirrors and at their neighbors to see that our nose is half way between our eyes and chin, and our mouth halfway between our nose and chin. They also felt from outer corner of their eye to the top of their ear. This helped students how to draw a proportionate face!

We talked about all of the fun things that make us unique (hair, eyes, lips, ears, clothing) and what would make us look like what we want to be when we grow up. After students drew their basic faces (along with the neck and shoulders) they began adding accessories to show us their chosen "career."
 |
| The Inventor! |
Students then traced over their pencil lines with crayon and began to color in their wonderful drawings with watercolor. We talked about how the watercolor resists the waxy crayon!

As students began to finish, I read them a sweet poem about our individuality:
No one looks
the way I do.
I have noticed
That it's true.
No one walks the way I walk
No one talks the way I talk.
No one plays the way I play.
No one says the things I say.
I am special.
I am me.
There's no one else I'd rather be!
And when I grow up
I guess we'll see
I can be anything
I want to be!
Some finished masterpieces:


Monday, February 7, 2011
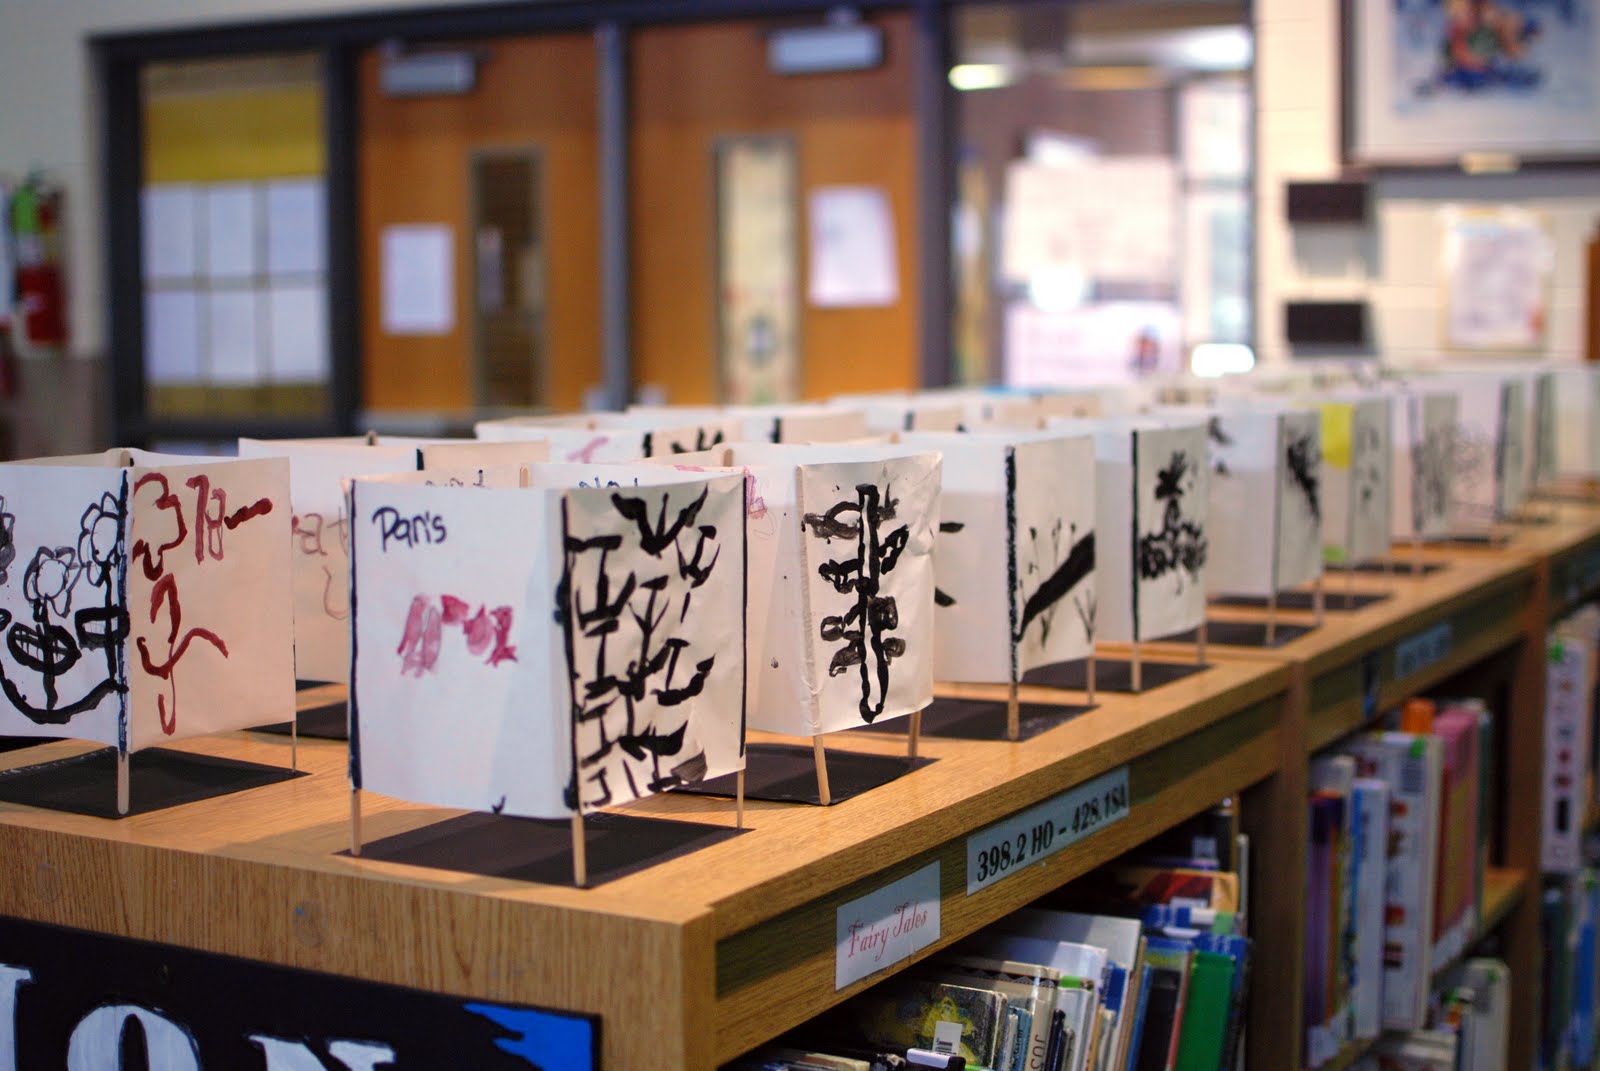
2nd Graders create Japanese Obon lanterns in honor of a loved one :)
This lesson began by watching an episode of The Wonder Pets, entitled "Save the Crane." (Some students thought they were too old for this at first...but they loved it :-P) In this episode, the Wonder Pets fly into a Japanese Sumi-e painting, a perfect kick off to this lesson! Students were asked to watch for the colors and styles used in the painting in the show. Afterward, they got to see some other Sumi-e style paintings. We talked about bamboo, landscapes, and even the way many Sumi-e artists stamp their work in red.

We then talked about the Japanese Obon festival, and how families create these lanterns and hang them to guide their ancestors home during Obon. I then told them to think of someone they'd like to make their lantern in honor of (alive or passed, or even a pet!). To incorporate writing into this lesson, I asked students to write 2-3 sentences telling me who they are making their lantern in honor of and why. (So sweet and thoughtful!) We then went on to the directions of planning their lanterns.
I translated each students' name into Japanese using Google Translate and gave it to them along with a packet containing various Sumi-e paintings and Japanese characters (along with their English translations). This packet also had a worksheet with four 6" boxes (representing the 4 sides of their lantern) in which they drew their designs. One side was to be bamboo, so they could practice traditional Sumi-e painting later. Another was their name in Japanese, the 3rd a Japanese character describing their 'ancestor,' and the 4th was up to them.
After students planned their lantern on their worksheet, they were given their "final" paper (6x24" vellum or tracing paper). I showed the students an authentic Sumi-e painting kit (thanks to my cooperating teacher!). They were so excited to see how it is used! We talked about how the ink is made and why the artists respect this process and take their time.
I demonstrated how to use the brush to create thick and thin lines while they create their bamboo and other pictures/words. We used mainly black (traditional Sumi-e ink), but students used red for their names (like the stamps traditionally used) and a few other watercolors often seen such as yellows and purples.
(Note: While students worked, I found various videos of the Obon ceremony playing very soothing music...this worked wonders, and the kids loved it!)
We constructed the final products with 7.5" thin popsicle sticks and a 7" square of black construction paper. I brought in battery powered t-lite candles so we could turn off the lights and safely see all of the lanterns lit up! These were then displayed in the school's library for everyone to see :)


IL.26.A.1e - Visual Arts: Identify media and tools and how to use them in a safe and responsible manner when painting, drawing and constructing.

We then talked about the Japanese Obon festival, and how families create these lanterns and hang them to guide their ancestors home during Obon. I then told them to think of someone they'd like to make their lantern in honor of (alive or passed, or even a pet!). To incorporate writing into this lesson, I asked students to write 2-3 sentences telling me who they are making their lantern in honor of and why. (So sweet and thoughtful!) We then went on to the directions of planning their lanterns.
I translated each students' name into Japanese using Google Translate and gave it to them along with a packet containing various Sumi-e paintings and Japanese characters (along with their English translations). This packet also had a worksheet with four 6" boxes (representing the 4 sides of their lantern) in which they drew their designs. One side was to be bamboo, so they could practice traditional Sumi-e painting later. Another was their name in Japanese, the 3rd a Japanese character describing their 'ancestor,' and the 4th was up to them.
After students planned their lantern on their worksheet, they were given their "final" paper (6x24" vellum or tracing paper). I showed the students an authentic Sumi-e painting kit (thanks to my cooperating teacher!). They were so excited to see how it is used! We talked about how the ink is made and why the artists respect this process and take their time.
I demonstrated how to use the brush to create thick and thin lines while they create their bamboo and other pictures/words. We used mainly black (traditional Sumi-e ink), but students used red for their names (like the stamps traditionally used) and a few other watercolors often seen such as yellows and purples.
(Note: While students worked, I found various videos of the Obon ceremony playing very soothing music...this worked wonders, and the kids loved it!)
We constructed the final products with 7.5" thin popsicle sticks and a 7" square of black construction paper. I brought in battery powered t-lite candles so we could turn off the lights and safely see all of the lanterns lit up! These were then displayed in the school's library for everyone to see :)


IL.26.B.1d - Visual Arts: Demonstrate knowledge and skills to create visual works of art using manipulation, eye-hand coordination, building and imagination.
IL.26.B.2d - Visual Arts: Demonstrate knowledge and skills to create works of visual art using problem solving, observing, designing, sketching and constructing.
IL.27.A.1b - Identify how the arts contribute to communication, celebrations, occupations and recreation.
Monday, January 24, 2011
"This is Me" - A 4th Grade Bookmaking Lesson
This lesson combined Language Arts, Illustration, Oragami, and Bookmaking! We discussed autobiographies and students began using markers, card-stock, and their yearbook photos to create a front and back cover. They then filled out worksheets all about them to give them some ideas for their books.
I then showed them what our pages were going to look like, and they then took a planning worksheet to complete as a rough draft before drawing and writing on their final pages.
I demonstrated the paper folding for the pages at the demonstration table, and again at the front of the room with a much larger piece of paper, while students followed along step by step. They also had a step by step handout in front of them for even more reinforcement. Onces all of their colorful pages were folded and properly glue together, I showed a few examples of in-progress and completed books so they could get some inspiration for their illustrations and embellishments.
They really had a great time with this lesson and put a lot of thought and effort into them. They turned out to be a great keepsake!


IL.25.A.3e - Visual Arts: Analyze how the elements and principles can be organized to convey meaning through a variety of media and technology.
IL.26.B.3d - Visual Arts: Demonstrate knowledge and skills to create 2- and 3-dimensional works and time arts (e.g., film, animation, video) that are realistic, abstract, functional and decorative.
IL.28.D.3c - Present a simple, original poem or story based on a model.
I then showed them what our pages were going to look like, and they then took a planning worksheet to complete as a rough draft before drawing and writing on their final pages.
I demonstrated the paper folding for the pages at the demonstration table, and again at the front of the room with a much larger piece of paper, while students followed along step by step. They also had a step by step handout in front of them for even more reinforcement. Onces all of their colorful pages were folded and properly glue together, I showed a few examples of in-progress and completed books so they could get some inspiration for their illustrations and embellishments.
They really had a great time with this lesson and put a lot of thought and effort into them. They turned out to be a great keepsake!


IL.26.B.3d - Visual Arts: Demonstrate knowledge and skills to create 2- and 3-dimensional works and time arts (e.g., film, animation, video) that are realistic, abstract, functional and decorative.
IL.28.D.3c - Present a simple, original poem or story based on a model.
Thursday, January 20, 2011
Kindergarten goes Mondrian!

My Kindergarten classes were introduced to the works of Piet Mondrian. They saw everything from city streets to windows to mazes! We learned that work like this is called Abstract art. We also talked about primary colors, and horizontal & vertical lines during an interactive discussion.
Over two 30 minute class periods, students created their own artwork in the style of Mondrian. They pasted black strips on a 12x18" piece of white paper on Day 1, and then used tempera paints in the primary colors (Red, Yellow, & Blue) to fill in whichever squares they'd like that they created with their strips on Day 1. Here are some results!

- IL.25 - GOAL: Know the language of the arts.
- IL.26 - GOAL: Through creating and performing, understand how works of art are produced.
- IL.26.A.1e - Visual Arts: Identify media and tools and how to use them in a safe and responsible manner when painting, drawing and constructing.
Wednesday, January 12, 2011
Papier Mache People! - 2nd Grade
In this lesson, we discuss movement and the human form. Students had fun sculpting a basic human figure out of tin foil, wrapping it in masking tape (like a mummy!), and then covering their mummified figure in papier mache. Some students weren't very fond of getting messy with the glue/water mixture, but they warmed up to it soon enough. I demonstrated the process and showed that getting messy (when it's appropriate) can be a lot of fun!

After their figures dried and were glued to a chipboard base (hot glued by my cooperating teacher and I), students used tempera paints to add color and patterns. They also had the opportunity to accessories and embellish their sculptures with yarn and fabric scraps! They had a lot of fun with this lesson and learned a lot about movement and balance :)


This is also a great time to show the burlap work of Magdalena Abakanowicz!
 |
| Dancing Figures - Magdalena Abakanowicz |
After their figures dried and were glued to a chipboard base (hot glued by my cooperating teacher and I), students used tempera paints to add color and patterns. They also had the opportunity to accessories and embellish their sculptures with yarn and fabric scraps! They had a lot of fun with this lesson and learned a lot about movement and balance :)


Subscribe to:
Posts (Atom)